How to Create a Robot for Beginners in Easy Steps?
Creating a robot can seem daunting. However, it is a rewarding experience that anyone can accomplish. Experts in the field, like Dr. James Harwell, say, “To create a robot, you must embrace both creativity and problem-solving.” This mindset opens doors to innovation and understanding.
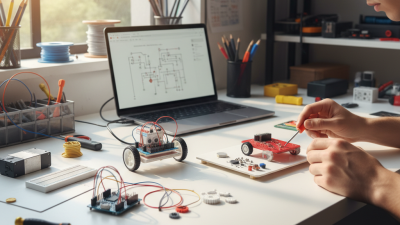
When you decide to create a robot, think about what tasks it will perform. Begin with simple designs and easily accessible materials. Your first project can be a small wheeled robot. Use basic electronic components, like motors and sensors. These elements combine to create a functioning unit. Every tiny success teaches valuable lessons.
Mistakes will happen. A miswired circuit can disrupt everything. Learning from these errors is crucial. Reflecting on what went wrong leads to improvement. Remember, the journey to create a robot is just as important as the final product. Enjoy the process, and let your imagination guide you.
Understanding the Basics of Robotics for Beginners
Robotics is an exciting field, especially for beginners. Understanding the basics can empower anyone to create their first robot. According to recent industry reports, the global robotics market is projected to grow to $500 billion by 2025. This growth highlights the increasing interest in robotics technology.
Begin with the fundamentals. Learn about sensors, motors, and controllers. Start with simple kits that provide all components. Use online resources to understand basic programming. You don't need to be an expert right away. Mistakes will happen, and that's okay. Troubleshooting your errors is part of the learning experience.
Tip: Don’t rush into complex designs. Take time to experiment with simple circuits first. Seeing how a basic robot moves can be incredibly motivating.
Engage with online communities. Forums can offer support and inspiration. Share your projects and seek feedback. Remember, not every attempt will succeed. Some designs may not work as expected. Reflect on why they didn't. This reflection is key for growth in robotics. Embrace the challenges along the way and you'll improve continuously.
Choosing the Right Components for Your Robot
When creating a robot, selecting the right components is crucial. Start with the microcontroller. It acts as the brain of your robot. Choose a model that fits your needs. Some beginners prefer simple ones. Others might want more features. Research is key here.
Next, consider the sensors. They help the robot interact with its environment. Ultrasonic sensors detect obstacles. Infrared sensors can follow lines. Decide what tasks you want your robot to perform. Different tasks require different sensors. Sometimes, it’s easy to overlook this part.
Finally, think about the body structure. You can use plastic, metal, or even cardboard. Ensure the materials are durable yet lightweight. Remember, it’s okay if things don’t go perfectly. Reflect on your choices as you build. Learning from mistakes is part of the process. Building a robot can be challenging, but it’s all about experimenting and improving along the way.
Step-by-Step Instructions for Assembling Your Robot
Assembling your first robot can be both exciting and challenging. Begin with some basic materials. You'll need a microcontroller, sensors, motors, and a chassis. These components can often be sourced at local electronics shops. According to recent industry reports, the global DIY robotics market is expected to grow at a rate of 22.8% between 2021 and 2026.
Once you have your components, it’s time to assemble them. A clear step-by-step approach can help. Start by connecting the microcontroller to the motors. Don't forget to test the connections. The wiring may seem confusing; it often is. Many beginners overlook this stage and face frustrating issues later. Remember to double-check everything.
Next, attach the sensors to the chassis. These help the robot navigate its environment. Make sure they are placed correctly. Misalignment may cause malfunctioning. While assembling, keep in mind that every mistake is a learning opportunity. Reflect on each choice you make during the build. Not every design works perfectly. Debugging can be time-consuming, but it’s part of the learning process.
How to Create a Robot for Beginners in Easy Steps? - Step-by-Step Instructions for Assembling Your Robot
| Step Number |
Description |
Materials Needed |
Estimated Time |
| 1 |
Gather all materials and tools required for the robot assembly. |
Robot kit, screwdriver, wire cutter, and safety goggles. |
30 minutes |
| 2 |
Assemble the base of the robot using the chassis pieces. |
Chassis parts, screws, and a screwdriver. |
45 minutes |
| 3 |
Attach the wheels and motors to the base. |
Wheels, DC motors, and nuts/bolts. |
30 minutes |
| 4 |
Wire the motors to the microcontroller and power supply. |
Microcontroller, jumper wires, and battery pack. |
30 minutes |
| 5 |
Program the microcontroller to control the robot. |
Computer and programming software. |
1 hour |
| 6 |
Test the robot to ensure all components are functioning properly. |
Testing environment and tools to troubleshoot. |
30 minutes |
Programming Your Robot: Simple Techniques to Get Started
Programming your robot can be an exciting journey. You don’t need to be an expert.
Start with basics like block programming languages. They allow you to create simple commands with visual interfaces.
This makes it easier to grasp the fundamentals without getting lost in complex syntax.
Once you get comfortable, try simple coding practices. Use simple functions to control movements.
For instance, make your robot move forward or turn left with easy commands.
Measure how your robot reacts. Does it behave as you expected? If it doesn’t, that’s okay!
Reflect on what might have gone wrong. Maybe your code has a small error, or perhaps the logic needs adjustment.
Experimentation is key. Adjust parameters and try again.
You may face frustrations, and that is part of the learning process. Not everything will work perfectly.
Embrace the challenges as you learn. This is how you progress, and it helps you understand programming better.
Keep refining your skills, and soon, your robot will be moving smoothly!
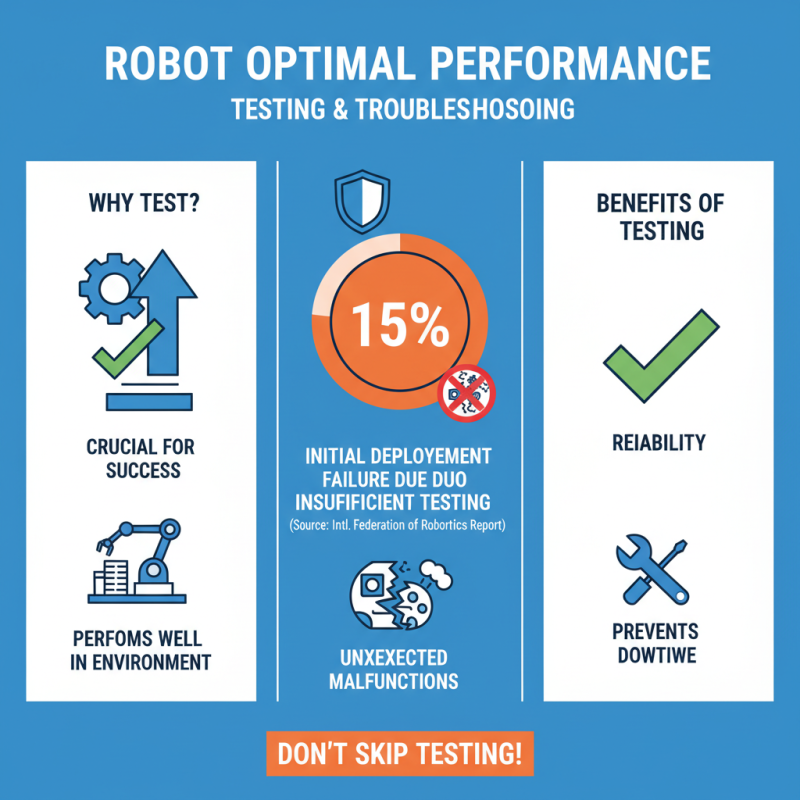
Testing and Troubleshooting Your Robot for Optimal Performance
Testing your robot is crucial for success. Effective testing ensures that your robot performs well within its intended environment. According to a recent report by the International Federation of Robotics, around 15% of robots fail in their initial deployment due to insufficient testing. This is a significant figure. Ignoring testing can lead to unexpected malfunctions.
During testing, focus on functionality and stability. Use a checklist to validate each component. Check the sensors, motors, and software integrations step by step. Many beginners overlook the importance of calibrating sensors. In fact, 25% of robot failures stem from miscalibrated sensors and inaccurate readings. This simple step can make a huge difference in performance.
Troubleshooting is essential when facing issues. Begin by identifying the symptoms. Is the robot not moving? Is it losing connection? Document the steps taken. This can guide you in figuring out recurring problems. According to engineering studies, 30% of engineers recommend maintaining logs during troubleshooting. This practice can enhance your understanding of the robot's behavior, helping to refine its design over time.